Sunday, July 27, 2008

My new machine

Well, it's far, far from "new" actually! My beloved boyfriend Ed bought me a gorgeous Singer 201 sewing machine made in 1938! Amazingly, he got it at Goodwill for a princely sum of $50. To those on a budget you know that is a splurge, but in this instance, well worth the money! It came with the table and works off of a knee controller. It worked when we tested it in the store, but upon bringing it home we noticed that the wiring is completely shot. Once we started fiddling with it (and after consulting a vintage Singer sewing group I've been in since I got the Stylist), we've decided to re-wire the motor and controller. The wires to the light and switch seem to be ok for now, so rather than make more work for us, we're leaving it alone, unless those start to disinegrate too. The other wires just crumble to the touch.
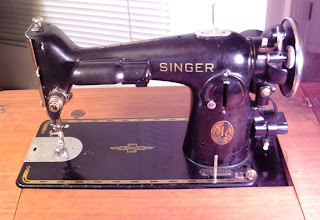
We're going to do some before and after pics of the parts. The metal plates on the front and the back (not pictured) were just filthy!

Here is what the cord that goes from the machine to the controller looked like. You can also see the motor wires above that (they look like a join in the machine). We've already bought some replacement cord/wire. The friendly sale guy at Ace Hardware told us we might want something a little more heavy duty than simple lamp wire, so we got a 6 ft power cord we're going to use instead. Apparently it can stand a higher temp if this machine runs hot. We are going to try and find a service manual, in addition to the regular manual, so we will kind of know what we're doing. There seems to be a seller on ebay that has a copy of a service manual that I'm thinking about getting.

We sure got ourselves into something with this baby! But, it will be a fun project we both can work on, and not too much of an investment. Since it doesn't seem to need any other replacements that I can tell, and the finish of it is in great condition, I think that Ed got me a pretty sweet gift! Though, I think he now has a "thing" for these older machines. He seems to spot them faster than I can.

I'll keep posted about the progress, for those that are looking for the same information. I'll try and document what we do as well. I've searched high and low for instructions on how to rewire this thing, and haven't found anything. A very helpful member of the Singer group I'm on has given me a wealth of information though. So, with trial and error and hopefully a serivce manual, we'll get this thing done!

Monday, July 21, 2008

Simplicity 5194 - Shirt


This is an OOP, from 2004 but I got it from the thrift store for 69 cents, so I couldn't beat that. I went with view A, that had the longer sleeves and the regular bottom. The design was cute, and has a V neck that isn't too low.

I ended up making 3 different muslins trying to get the right fit. I did an FBA and the front fit ok, but the sleeves, where it meets the bodice and back around the bust area was very tight and the sleeve cap seam was too far away from where it needed to be. I couldn't move my arm forward or back without a terrible pull. I had a hell of a time trying to figure out what to do.

I ended up using a slope shoulder adjustment and adding to the areas where it pulled. That meant that the whole arm area needed to be redrawn. To add to that, I originally had made an adjustment on the sleeve and facing because my arms are fat and probably wouldn't have even fit in the original sleeve. That meant that I had to re-do the sleeve cap too, which too a lot of fiddling and trimming off. I also added to the length. All in all, a kind of frustrating fitting for this pattern, but it ended up coming out ok.

As you can see on the right arm (your left in the photo) it still pulls some when I reach back. But, once I got to this point I quit. I ran out of patience. But, it's not too bad. I have some RTW shirts that have a pull like that, and I guess it's expected in more fitted shirts (and with a full bust).

The fabric is some kind of poly I think. I got it at a going out of business sale at a Joanns for a dollar a yard. It is very silky feeling and is so drapey it's limp.

I did have to add a snap to the top of the button/button loop area because in my alterations, somewhere along the line, the facing for the neckline and along the front of the shirt got skewed and my dots weren't in the right place. I had to wing it on collar placement and it ended up being a little off, so then I had to re-do the buttons so that it wouldn't sit skewed. That gave me too much room at the very top, so if I didn't want the front to gape open a bit, I needed a snap.

Sunday, July 20, 2008

Fit For Real People


I have mentioned before that I have found Fit For Real People an absolute goldmine of information for the beginning sewist. I have been hoarding the copy I have from the library for about 2 months now (thankfully nobody else has put it on hold) and using it every chance I get on the projects I work on. Since this blog is about sewing on a budget, since I am on one, I haven't purchased it yet. I've been patiently waiting for my next gift card to Barnes and Noble to arrive that I get (for free) from Mypoints. I receive emails from them and "clickthru" to a site they link to in the email, occasionally buy something and "clickthru" from their website to the retailer, and do surverys. I accumulate points that I can then redeem for gift cards, of which, Barnes and Noble is my favorite.

Today I finally got another gift card and was able to place my order for my own copy of Fit For Real People. I'm sure the library will be very happy once I return the book I've been using, even if it is maybe a little more worn than when I checked it out.

Sunday, July 13, 2008

One Yarder, Fast Project

I'm recovering from a small medical procedure, so any long term projects are put on hold. But, I've managed to start and finish a small project using only a single yard of fabric, which is great to use up leftover fabric too.

This is Kwik Sew 1672 an 80's OOP that I purchased off of ebay some time ago. It uses a single yard of fabric and is absolutely perfect for making boxers for Ed because getting him to go shopping for anything new is like pulling teeth. On the other hand he doesn't mind going fabric shopping with me, so if we find a cool fabric he likes it usually gets made into another pair of boxers. This fabric was a whopping dollar from the big W. Cost is about $2.00 per pair or less if I can find el cheapo fabric, which isn't bad considering that it's easier to make a pair than to get him to go buy clothes. It uses plain pajama/underwear elastic along the waistband and is a pretty fun and easy pattern to make. There are two views, one that has the squared leg and one that curves upwards (think 80's short short for men).

The leg detail is the fiddliest:
And yes, the sides don't match. I'm not that advanced yet, and it would mean I had to use more than one yard.

I did have to make some adjustments since the seam allowance is only 1/4 inch. The slits needed have an additional 1/4 added to each edge since it would have left a raw edge if I only folded it over once, like the instructions say to.

Sunday, July 6, 2008

Tips For Sewing On A Budget


It's hard to have any craft or hobby and do it on a budget. That means no credit cards too. I don't use credit cards, so any new hobby I have I have to pay for in cash, when I have a little extra.


So, my tips for sewing on a budget:

  • Shop at thrift stores
This is my key to sewing on a budget. I buy sheets, as long as they don't have holes or smell for cheap muslin fabric (and for garments when approriate) and shop the "tag of the day" when possible. I have a rule that I usually stick to and that is, if the fabric is under $2.50 I'll buy it without a tag (for something over one yard) and if it's over I will wait for that tag to go on sale. Ask the sales people when the tags are. Don't just limit yourself to fabric either, check out the bagged items (Goodwill and Savers have bagged items on the walls). Thread and other notions can be found there. From my experience, bagged items are usually under $4-5.
  • Shop yard sales
Technically I don't yard sale, but if you do and don't have good thrift stores near you, yard sales are a good way to go. If possible call them the day of and ask if they have linens and/or sewing things. A lot of people will post their phone number along with an address if they aren't just off the main street so you can call for directions. When I've done yard sales I haven't minded at all if someone called me and asked if I had large furniture or whatever. It saves on gas and a wasted trip.
  • Have patience
You don't need those brand new pinking shears right this instant. There are other ways to finish your work; it just takes longer. Wait for the really good sales! Make do until you can upgrade cheaply, but not by sacrificing quality. Use coupons! A lot of craft and fabric stores will take competitors coupons.
  • Ask on Freecycle
If you aren't aware of Freecycle yet, get your butt off to Freecycle.org and find your local group. I got my first sewing machine, a Babylock, off of someone from Freecycle in my area. I always see people asking for and giving away bags of scraps (perhaps you quilt?), and I'm collecting a little stash of scraps myself that I will give away on Freecycle too. Be willing to drive and use the gas to go pick up a sewing machine, or something that you really want. What is gas money when in the end you could be saving hundreds? Also, ask nicely. My mother always said that you could attract more flies with honey than you could with vinegar (um, ew), but that is pretty true when asking for something. Please's and thank you's make a world of difference. Post a "want" and not "need" and be polite. I know I shouldn't even have to say that, but I can't tell you how many rude posts asking for things I see on my local group.
  • Go to Walmart
Yes, I said it. I'm no fan of Walmart as a whole, but when you are on a budget, Walmart is a nessesary evil. I buy all my bobbins there, and dig through the clearance fabric. I know that a lot of Walmarts have taken away the fabric section, but if you do have one, take advantage before they take away yours too! I haven't yet had a problem with the tracing paper, bobbins, fabric, and inexpensive scissors (though I will upgrade those eventually) that I've gotten from Walmart.
  • Learn shortcuts or tips
Things like using a pin pinned to an ironing board to make bias tape instead of buying a fancy bias tape maker, or using a sponge (which can be found at the dollar store) as a pin cushion. There are tons of tips and sewing advice to be had if you read blogs, websites and use your friendly pal Google.

Pin cushion image courtesy of erellsworth.com

Tuesday, July 1, 2008

Note: Don't Sew While Tired

Last night I wanted to get some sewing time in between the hours of 12am and 3am. I've been trying to adjust my schedule (I'm a night owl) from going to bed at 4am to something earlier because of a terribly early doctors appointment in about a week. So, I've been pretty tired lately, especially since I've been on some medication that causes drowsiness. I was pretty much a zombie last night, but I was determined to finish sewing the McCalls 8107 2nd wearable muslin. I ended up sewing the neckline/armhole facings (all in one), grading and clipping before I realized that it was backwards. I also realized that I had been working off of the wrong set of instructions and had inserted the zipper before I should have, which I had to tear out today since I was disgusted with the whole thing last night by the time I had corrected my mistake.

So, lets hope the next time I decide that I'm bound and determined to sew, that I'm not so tired.