
Wednesday, October 28, 2009
A Cure for Wrinkled Interfacing
I just came across a tip from Off the Cuff about wrinkled interfacing. I thought it was a wonderful tip and had to pass it along. How To Rescue Wrinkled Interfacing!
Monday, October 12, 2009
Review: SAS Fabrics Phoenix, AZ
Review for:
SAS Fabrics
SAS Fabrics
9840 N 19th Ave
Phoenix, AZ 85021-1906
(602) 943-7777(I am providing the 19th Ave location information because I'm not sure the Indian School location information on Google is correct, although I did go to another location.)
The other day a friend took me to SAS Fabrics in Phoenix, AZ. I went to the 12th St/Indian School Rd location, although they do have more locations in the Valley area (see contact info above). I had never been, but heard stories. You know, the kind you dismiss as nothing but rumor, like Bigfoot.
The outside is uninspiring, with a large sign advertising that they have air conditioning (I thought, what is this, the 50's?), which I suppose in Phoenix, where summer temps can climb to above 110º F for weeks, isn't such a bad thing to advertise. Apparently before they revamped the place (and closed it for a time) there was no A/C, only an evap/swamp cooler, which for those that don't know, only works as long as the humidity is low.
Through the windows you can see piles of fabric in all colors. And then you walk in...
I've never seen the like. JoAnns doesn't even compare! From one wall to the next there was nothing but shelves with rolls of fabric, tables piled with cut pieces and bolts and boxes full of fabrics, trim, lace, ribbon and anything else you can imagine a sewist needing. They sell fabric both by the POUND and by yard. The prices are inbelievable. Beautiful silk for $6.99+ per yard, denim for $2.99 per yard, and suitings of all sorts for $2.99 per pound among other things. Their selection of faux fur was huge, they had a whole wall for upholstery fabrics (although I didn't browse those), fancies of all sorts from spangled to beaded. Cotton, silk, poly, wool and probably linen as well were there. They had boxes full of iron-ons in a great selection and while some were cheesy, there were others that were not. The only thing missing was a huge collection of buttons to browse through, which I was told by the friend that they do have at their 19th Ave location. They did have some buttons, but not a lot.
I was awestruck! It being a weekday and around 3pm as well, the place had a decent amount of people in there shopping, holding rolls of fabric. The cutters tables were very cramped, and they obviously didn't have enough room to roll out some of the large rolls. You took part in helping cut sometimes, as an extra hand to hold something, or to help unroll. After getting your fabric cut, your bag of fabric is placed behind the counter and they hand you a receipt that you then take to the cashier who finds your bag by your reciept number.
They accept most major credit cards and are open from 10am-6pm Monday through Saturday and closed on Sunday.
All in all, I will be back! I went there with a budget of $50 and only spent half on it, and came out very happy. I got 5 yards of a dark gray wool/polyester blend suiting for $2.99 per pound (about 3 pounds total) , 10 yards of some neat trim for $.25 per yard and 4 yards of denim for $2.99 per yard. And those are just "practical" things I bought. I think the next time I go back I'll get something a little more fun. A note though; there are no tags to tell you what the fabric is. You kind of need to know by feel what type of fabric is what and how blends feel as well, and treat later accordingly. It's a little like buying fabric at the thrift store, in that you don't know for sure exactly what you're getting since there are no tags, or labels stating the fabric content.
SAS Fabric gets 5 stars in my opinion. It could be better in indentification and sorting, but why fix something if it isn't broken? My friend called it "our Mood" (but cheaper!). perhaps I was just awestruck, but the place was amazing to me.
Friday, October 9, 2009
iDye Poly, My Experience
A friend wanted something made with black lace, but Joanns didn't have much of a selection. I found some great lace, but it was white. What to do, what to do? I went to the fabric marker/paint section and actually found "over the counter" dye for polyester! Which was what the lace I found was made of. So, eagerly I bought 2 packs. One for practice and one for actual dyeing.
Once I got a pot big enough for the task from the thrift store (enamel, with a lid) I set to work. In the iDye pack there is the colorant and a small package of clear goo that you put into the mix. I got my lace all cut off the batch and some skewers to swish it around with, since I somehow lost my wooden dyeing spoon from my last foray into fabric dyeing. The mix was heating up and I tossed in the lace. The instructions say to simmer the concotion, so I cranked up the heat to about medium high and waited.
As soon as it started heating up the stench of the hot dye was incredible. It was like burned rubber, but boiling burned rubber. It was so overpowering! I ran to open windows and turn on fans, and then back to the pot of dye to see if it was simmering yet. Not yet, so I stirred and tried not to inhale too many of the fumes. I was gagging by then, and usually smells don't really get to me enough that I get all queasy. I ran, again, but this time to find my face mask that I use when I use my dremel, or for drilling type projects. It isn't the cheapest, but it isn't like a gas mask either. Just a surgical type mask with a little filter on the front. Thankfully it helped, but the damage was done, in more ways than one.
After running back from digging through things for the mask, I came back to find the pot angrily simmering away, on the point of boiling. I slapped the lid on (which I hadn't done before then) and stirred a little but upon closer inspection I realized that a fine mist had formed from the boiling/simmer and there were tiny blue dots all over my kitchen. Even across the kitchen! I can only imagine how much of that I inhaled before putting the mask on, which I didn't do until after I scrubbed at the counter tops to see if it would come off. For days afterwards my lungs hurt. I don't think there were any lasting effects, but it was a little scary.
Despite the mask, the smell was just too much. The instructions say to simmer it for 1/2 hour to 1 hour, but after about 25 minutes I had to stop that smell. So, I pulled everything out early, rinsed both pot and lid and lace and then spent the next hour using oxy clean and a scrubbie to get the blue mist off my counters, appliances and sink. I am still finding spots with blue mist all over it, where I didn't see it at first.
But, the lace came out great even though I pulled it out early! There is a faint green tinge to it in places, but for my first experiment with it, I'm happy with the product. At least in terms of how well it works. The stink on the other hand, really turns me off.

Dyed lace. Unfortunately Ed turned the lace with the wrong side up, so you don't get to see the cute ribbon detail on the front, but you get the point.
Next time I will use my little propane powered camp stove and do this outside. There is no way that I will have that disgusting smell in my house again. Oh, and another point: No where in the instructions did it say to ventilate! It said "do not inhale" but that is far different than talking about ventilation. I'm surprised at that.
If you do choose to use iDye Poly, you really, really need to have good ventilation. The smell lingers, but does dissipate with time. I think by the next day it no longer smelled like burned rubber in my apartment.
If you do choose to use iDye Poly, you really, really need to have good ventilation. The smell lingers, but does dissipate with time. I think by the next day it no longer smelled like burned rubber in my apartment.
Sunday, October 4, 2009
A Revisit, A Steampunk Halloween and Embroidery

Last Halloween
I made the blouse in this picture last Halloween for a "Steampunk Halloween" with some friends and while I did more of a "proper Victorian lady" than a gal with hiked up skirts, a corset and a gun, which seems to be pretty popular, I still love the costume. Since then I've used it in a photo shoot for the same friend who hosted the Halloween party, for her photography class. In the time since last Halloween I've slowly collected some bits and bobs of brass stampings, some glass gems and some more brass jewelry pieces. I made myself some really cute hair clips and then decided that I should have matching buttons.

Hair clips and fabric covered button
The button in the picture is a fabric covered button with a blue glass stone in a brass setting (which is a little hard to see since it's got beads around it), with a little bead embroidery surrounding it. They all came out great! I used Czech 11's for the beads, in a pearlized white and just bead embroidered around the blue stone using Nymo, which is my personal favorite for anything bead woven or embroidered, although you don't have to use Nymo bead thread. I just happen to have a lot of it since I do bead.
Here is what the whole costume looked like at the photo shoot. Notice that I also have a "parasol". It was really just a blue umbrella that I sewed lace onto in 2 rows.

Photo shoot with new buttons, hair clips and parasol
Once I got home, I had started a little regular embroidery, just to practice. I thought that it would be a great idea to add a little embroidery to my costume. I found some images online (here is a great source, and these are from there) and traced them onto some thin-ish canvas to practice on.


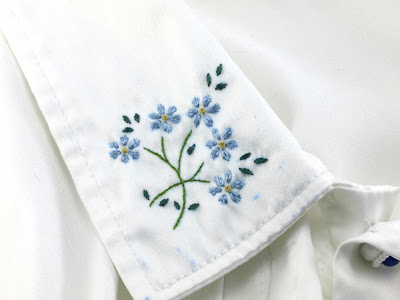
After picking the flowers in blue as my choice I then copied the image to the corners of my collar on the blouse. It took a few days to get done, since I have to take a lot of breaks because of carpal tunnel, but I absolutely love it!

I also plan to do some more embroidery on the sleeves or cuffs somehow. But since they are pretty baggy, I'm not quite sure where to place them or if it should be on the sleeves and cuffs, or just the sleeve OR cuff. A conundrum.


After picking the flowers in blue as my choice I then copied the image to the corners of my collar on the blouse. It took a few days to get done, since I have to take a lot of breaks because of carpal tunnel, but I absolutely love it!

The blue smudges are just transfer paper marks that I haven't washed off yet. They aren't a part of the embroidery.

Close up of collar
I also plan to do some more embroidery on the sleeves or cuffs somehow. But since they are pretty baggy, I'm not quite sure where to place them or if it should be on the sleeves and cuffs, or just the sleeve OR cuff. A conundrum.
Subscribe to:
Posts (Atom)

